Showing posts with label natural dyeing. Show all posts

Friday, January 18, 2013

Recycling: The Camel Hair Coat Chronicles

There are only a few pieces left from the man's camel hair coat I bought at Goodwill last fall. Students in a natural dye class last fall used most of the coat. I kept the parts that were gunky with fused interfacing.


Some of that got used in a project for the Cross-Knit Looping eCourse that started this week. Registration for XKL closes tomorrow, but you can still get into New Age Looping Basics, which begins February 5.


Students will see it in Lesson 2, which posts next Tuesday.


I love working with this camel hair fabric and wish I had more. But I'm not even tempted to contribute my own camel hair coat to the cause. It was my mom's playground duty coat. When she retired from teaching, she gave it to me. It has to be 25 or 30 years old but it's still my go-to coat for dressy occasions and any occasion when temps are sub-zero.

You may see a picture of it next week.

I guess it's time to scour the thrift shops for another camel hair coat.

What kind of recycled materials are you on the hunt for? And what's your best thrift store find?

Sign up for my email newsletter here.

Monday, January 7, 2013

January Thaw

The holidays are over, the winter solstice is past, and we're taking baby steps toward more hours of daylight than darkness.


For me, those few extra minutes of daylight at the beginning and end of the day make a huge difference in how I feel. Or maybe it's just getting back to the routine of deadlines to meet. In any case, it's great to have a boost of energy and feel productive again. Could it be partly because I'm keeping up with my creativity warm-ups?


Here's the reward that's waiting for me when I mark a few more things off my to-do list:  I'll thaw out some of my frozen natural dye materials and start the transformation of this "winter white" yarn into other colors.

Are you feeling the January thaw?

Subscribe to my email newsletter here. And thank you for reading Two Red Threads!

Friday, December 7, 2012

Registration Open for Cross-Knit Looping eCourse

It's official: Registration is open for the my newest eCourse, Cross-Knit Looping. The technique is sometimes called Coptic knitting, Tarim stitch or Viking knit (that's right -- the fine silver jewelry is the same structure). Cross-knit is part of a large family of looping techniques. It can look so much like stockinette stitch that early artifacts were often misidentified as knitting. But it's pure looping: The entire length of the thread is pulled through on each stitch, and it can't unravel like knitting.

Click to go to eCourse registration
Cross-Knit Looping runs January 15-February 28, 2013. Here's a short video trailer I made for the eCourse.


There's more info and you can register for the class here.

 Like other forms of looping, cross-knit can stand entirely on its own. But it marries so beautifully with knitting, crochet, weaving and felt that I've included some fusion projects in the course. And I think handspinners and dyers will absolutely love this technique.

Cross-knit looping sun tea jar cozy and water bottle caddy (with felt)
Knit neck warmer with cross-knit looping placket and buttons
I really need a model to photograph instead of trying to shoot myself in the mirror. Incidentally, these pictures show projects done with my naturally dyed yarns. There are yarns straight from my LYS used in the course, as well.

Donna's project bag -- knitting, crochet, and cross-knit looping
One of my Sievers students this fall (Roseann?) asked for a recipe (in lieu of a pattern) for the drawstring project bag pictured above. I'll post that next time.

Saturday, November 24, 2012

The Video Studio

After a short break to celebrate Thanksgiving with family, I'm back to work on a new eCourse on cross-knit looping, which I'll tell you more about soon. In the meantime, here's a peek at my new video "studio."


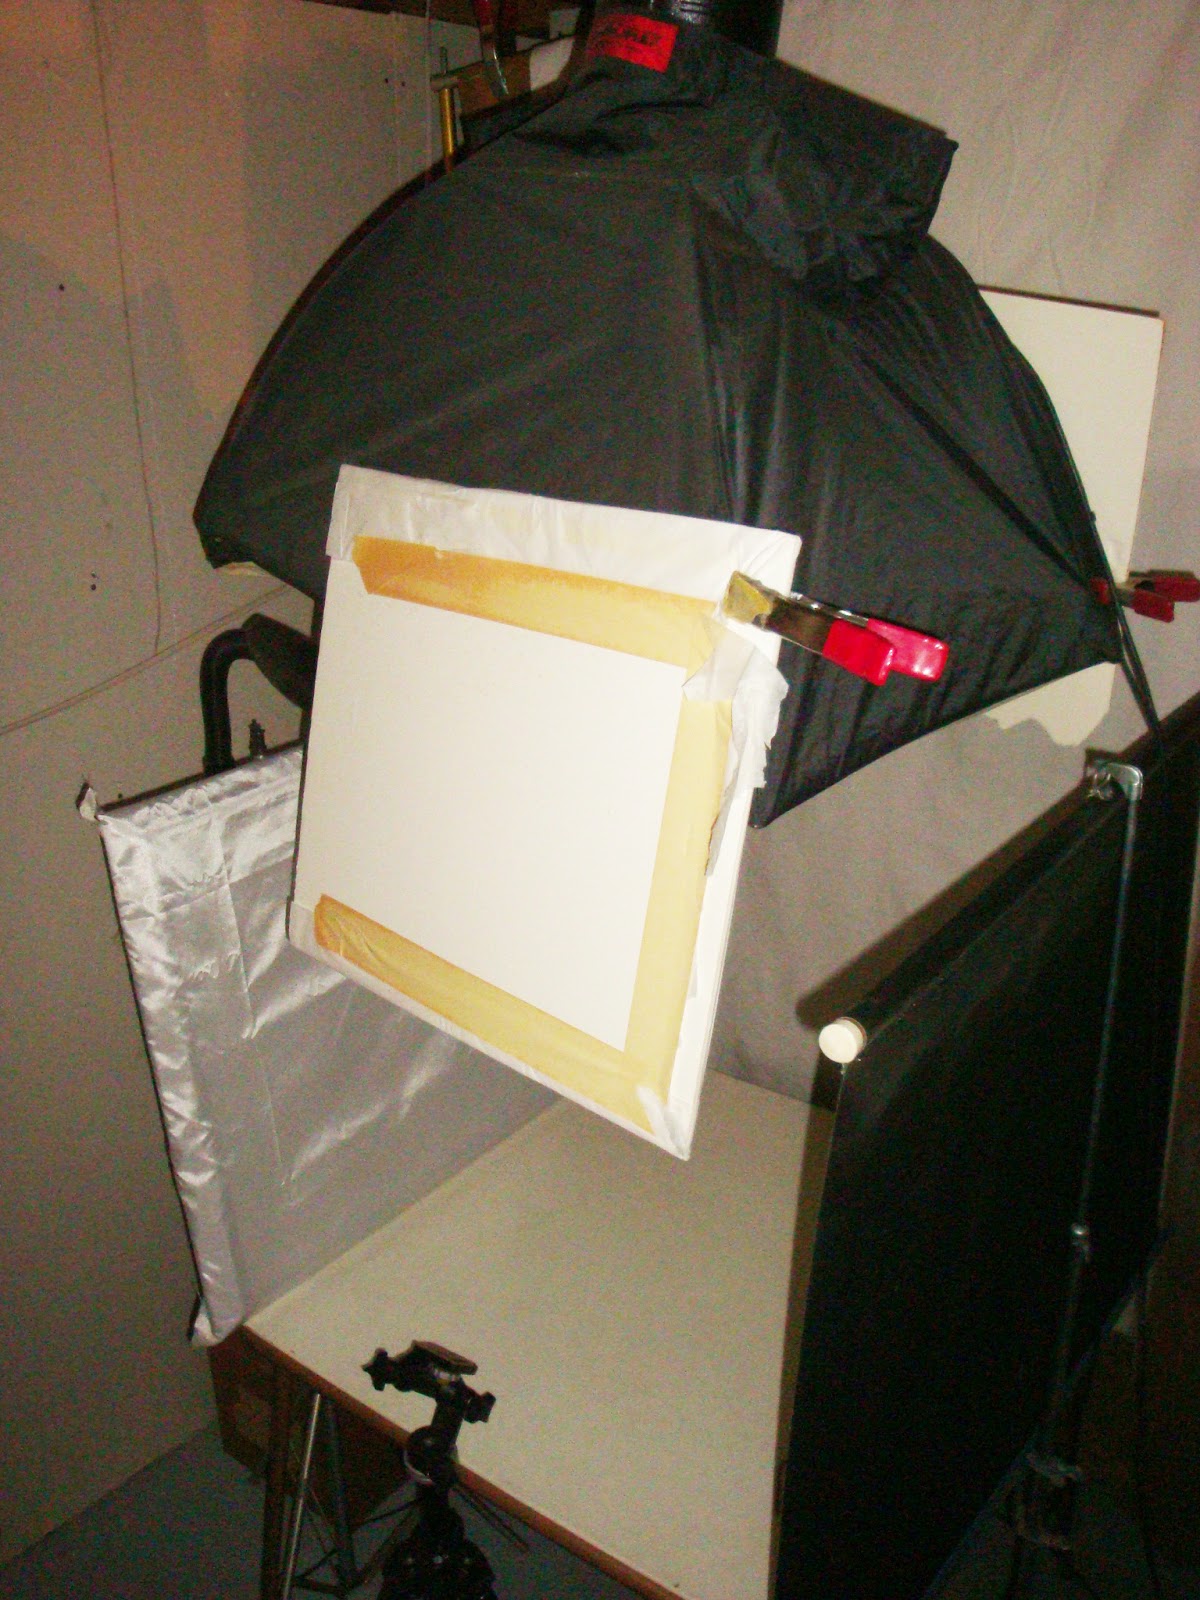
The homemade diffuser on the left is fabric stretched on an old picture frame. On the right is an old slide projector screen I found at the thrift shop. The white top on the card table (a family heirloom from the 70's) is easier for shooting than the fabric-covered table I used before. You can't really see the fabric backdrop or the two bounce lights. But here's the key element:


That black tent-like thing at the top covers a modeling lamp that gives diffused light from overhead. A friend who's a professional photographer helped me set up a photo studio back in the late 1990's, when I was still shooting my work on 35mm slides. I think we traded her a canoe for equipment, help setting it up, and lessons on how to shoot with it. Once I went digital, the flash didn't sync with my camera. It didn't occur to me until recently (duh) that I could use the modeling lamp without the flash.

The new set-up is tucked into a small space in our basement between the utility room and the cold room where we store squash and homemade wine. There isn't quite enough space to shoot the short "talking head" segments of the course, but it's working great for the close-up shots of my hands demonstrating techniques.

Speaking of hands, I stained my right hand with black walnut dye when my glove sprung a leak while I was doing "just a quick project." So no more dyeing until the last of the video is shot and edited!

Thursday, November 8, 2012

5 Reasons To Press Leaves

The piles that accumulated on horizontal surfaces during my teaching-travel season yielded some good stuff. Case in point: an index card with notes for a blog post I meant to write probably in August or September. Better late than never, right?


5 Reasons To Press Leaves Now (or then, or later, or someday)
  1. scan or photograph to print on inkjet fabric, make inkjet heat transfers or use in digital fabric design (i.e. Spoonflower). (FYI, at the bottom of the post is a video tutorial I did a while back that shows how I used Gimp to create a fabric design.)
  2. use as resists for disperse dye transfer prints (great for polyester sheer layers in fabric assemblages)
  3. print with or use as a resist for screening Inkodye on natural fiber fabrics.
  4. use as a resist for heliographic printing with Setacolor or Dye-na-Flow transparent fabric paints.
  5. use in natural dye ecoprint bundles
I also found a note that says, "Short vid tut on tech." Can't recall what technique I intended to document for posterity. Any requests?


Fall Fabric Video Tutorial from Donna Kallner on Vimeo.

Wednesday, November 7, 2012

Black (Walnuts) And Blue (Hubbard)

What I really need to do today is clear off horizontal surfaces because we have company coming for the weekend. What I'd really like to do today is start simmering a black walnut dyebath. We stopped at a friend's to pick up windfalls on our way home from vacation. But for the time being, those hulls can just steep in buckets.


I'm off to find the hatchet for splitting the first of the Hubbard squash grown by our friends in southern Iowa. This one task will clear a sizable amount of horizontal surface area in my house.


The other one will go into cool storage in the basement for a few weeks, along with the butternut and acorn squashes our friends sent along with the Hubbard, and the winter squashes that grew in our own garden.

I'm planning to sample using the stringy guts and seeds from that Hubbard for natural dyeing. Should work, right? I mean, what stain is harder to get out of fabric than spit-up squash baby food? I think it will require some experimentation with pH modifiers. Will keep you posted.

Monday, October 29, 2012

Leftovers Again? It's A Gift

Sometimes, a little of this and a little of that turns out to be just the right amount when you combine them. That's what I did with the dregs of several natural dyebaths. I can't tell you what all was in the concoction I used it to top-dye some yarn I bought at a garage sale. I can tell you I like the color now much better than the original garish red. That red skein will get overdyed shortly. In fact, I have a whole box of yarns set aside to overdye.


With holiday gift-making about to come to the top of my to-do list, I stashed another box by my sewing table. It's full of leftovers and unfinished demo pieces from this teaching season. That box is bigger than my "Black Hole," but I'm going to treat it sort of the same way: Set a timer, reach in, grab materials, make something. I don't expect to finish everything I start, or that they'll all be gift-worthy. But I'm feeling a need to limit the time I spend sorting through materials. Sometimes, that's just stalling.


More leftovers went into this quilted cuff I made for my sister. And a piece I made for my mom's birthday but forgot to photograph.

Can you guess what we had for supper?


Tuesday, October 23, 2012

Fall Color & Natural Dye

My natural dye workshop at Llama Adventures in Arena, Wisconsin was last weekend -- the perfect time to be downstate where there were still leaves on trees and the colors were spectacular.


The colors were great in the workshop, too!


This was a sampling workshop, and the group did an amazing job with the fast pace on Saturday.


On Sunday, they had more time to explore their own interests.


It's always fun to watch people who generally prefer exact measurements and predictable results embrace uncertainty....


...and those who generally roll the other way get into controlled-variable sampling mode.


From time to time "the girls" looked in on what was happening in the studio.


We ended the workshop with a short field trip to look at a stand of wild willow that, I suspect, will be used in dyepots ere long.

Tuesday, October 16, 2012

Soon To Expire -- Brewed Dyes & Discounts

Oops! I've been so focused on preparing for the natural dye workshop I'm teaching this weekend, I almost forgot a deadline. And it might be worth $300 bucks to you.

Thrifted men's camel hair coat -- deconstructed, washed & ready for natural dye workshop
If you're thinking of joining me for the Local Color: Ireland trip April 19-30, 2013, you can save up to $300 if you act by November 5. You get a $150 discount on the land portion of the trip if you make a deposit by that date. Celtic Journeys can negotiate a better rate on our lodgings if they're confirmed in November, and they pass that savings along to you. Also, if you pay in full by check instead of credit card by November 5, there's an additional $150 discount. The booking form is at http://www.celtic-journeys.com/locolreg.pdf. If you have any questions, please let me know or contact Maria Flynn Conway at Celtic Journeys.

Today, I did send a heads-up to folks on my email list. (If you're not already on my list, you can sign up here to get those emails. It's a bit different from getting these blog posts by mail.)


In the email, I included a couple of the interesting Ireland links I've been collecting. The Burren is one of our first destinations in Ireland, and the Burren land trust video above is fascinating. April should be a great time to see wildflowers there and elsewhere in Ireland. Here's a list of what might be blooming during the Local Color trip. And here's a list of some traditional Irish dye plants, which includes their Gaelic names.

And now, I really must go finish prepping for this weekend's workshop. These students get the last jug of raithneach (bracken) dye brewed from fresh leaves.

Raithneach a.k.a. bracken dye
After this weekend, I'll be using the bracken that went into the freezer for winter dyepots. And Bill will be getting back a shelf in the homebrew refrigerator.



Monday, October 8, 2012

Harvesting Color -- Bracken

Bracken dye brewed with iron, on cotton rug warp
Bracken fern grows in abundance in my neck of the woods. In September, I brewed up a big batch of bracken dye before I headed off to teach in Denver.

Bracken (left) and staghorn sumac leaves (right)
I find that giving a stained dyebath some extra time to sit in an aluminum pot can help brighten colors. I also find that I should tape a label to the pot lid, because my loose notes got mixed up and I can't swear to what kind of dyebath I used for a couple of things. The one at the top I know is the second simmer of a bracken bath in which I added some rusty nails to get that dark gray.

Merino top in bracken (?) dyebath
I'm only 90 percent certain this was the first dyebath extracted from that bracken. Oops.

Natural dye sampler workshop at Sievers' Gathering
Anyway. There's a good stand of bracken outside one of the studios at Sievers, so I cut enough to brew a pot for a short natural dye workshop I taught as part of the biennial Gathering the last weekend in September. The school is on Washington Island, and being surrounded by Lake Michigan has a huge influence on their weather. While the bracken at home was showing definite signs of frost and freeze, there was fresher stuff at Sievers.

Naturally dyed silk scarves
 In a 4-hour sampling workshop, there's not much time to take pictures. But trust me, students did some beautiful silk scarves, some of which were dyed with that bracken brew.

Unwrapping cold-bundled silk samples
They also unwrapped some silk I cold-bundled before I left for Denver so these students could swap swatches.

Students' sample cards for cold-bundled hops, bracken, Virginia creeper and willow leaves
 The second column from the left in this photo includes bracken leaves. I'm 90 percent sure the brew I basted some of the bundles with was bracken, too. The students got the idea, and probably learned to keep better records than I do!

Frozen bracken for winter dyeing
 In September, I "put up" enough bracken in the freezer to make several dyebaths. I'll try to do a better job of recording and photographing bracken when I brew those. Where did I put that tape?

Wednesday, September 26, 2012

Harvesting Color -- Hops

I'm putting bracken on hold a bit to see if I can get more photos this weekend at Sievers. And the hops dye was an interesting first-time effort for me. Here's what I got.

Cotton rug warp dyed with hops leaves and vines
I lost a bit of the color in the wash, but am still quite happy with the color. I dyed two more skeins of the cotton with the hops dye saddened with iron, but apparently didn't photograph them. Yet.

The hops are thanks to my homebrewing husband. Hops are used to flavor beer and act as a preservative. We were a bit late on the hops harvest this year, but better late than never.


Bill pulled down the vines for me, and I plucked the hops. Right now, he's making a batch of hops soda for me (kind of grapefruity-bitter -- I love it!).


After plucking the hops, I put the leaves and vines in a pot. It was a couple of days before I actually got water added to that pot. Then a couple more days before I simmered that pot. Still, I don't think the delay was the reason that simmering pot stunk up the joint.

Most of my homebrewed natural dyes have a pleasant fragrance. This one produced a color I like well enough to put up with the stink while it's brewing.

Friday, September 7, 2012

Harvesting Color -- Goldenrod

You understand how it is when you have company: Instead of "I should take pictures of this beautiful basket of hastily harvested dyestuff" you're thinking "Is there enough milk for breakfast tomorrow?"

Fresh goldenrod in the dyepot
But I did get goldenrod gathered while my parents were visiting. That went in the freezer -- we'll see how well that works this winter. And I got more gathered and brewed this week.

Goldenrod-dyed cotton rug warp

This is cotton rug warp, which I dearly love for looping projects. The variations in the dye uptake might not be to many dyers' tastes, but are perfect for what I do. I plan to wax this thread and use it in a bag with bracken-dyed rug warp. More on that next time.

In the meantime, I used the last of the milk in potato soup last night. Bill made do for breakfast anyway. Things are getting back to normal-ish here.

Thursday, June 28, 2012

Willow Workshops Of The Hybrid Sort


In one of the workshops I taught at last week's Willow Gathering in Decorah, Iowa, students dyed silk fabrics with willow leaves, twigs and bark.


Then they modeled and designed constructed vessels...


...that used those naturally dyed fabrics.


After a busy day of dyeing, we started the second day of the workshop by making simple vessels from the leaves of cupplants growing near the building.


Then my students jumped into modeling for constructed vessels. As usual, I got busy and didn't manage to take pictures of them with their models and fiber phyllo vessels. 


Willow has a reputation as a plant that crosses easily, which sometimes makes it hard to identify the exact species. I guess that applies to me, too: Many ideas have crossed in my head and hybridized.

You could practically see ideas flitting around the room cross-pollinating each other. I certainly came home with notions to nurture until it's time to thin them out.

Luckily for the Canadian contingent, it's easier to carry living ideas across the border than fresh plant materials.


Thursday, June 14, 2012

Unintentional Image Transfer

Next week I'm teaching a workshop where students willow-dye silk fabrics they'll use in vessels. I often wrap dye bundles around a short piece of copper pipe. We saved lots of short pieces when Bill installed the plumbing in our house. But some of the pieces have never been used before in dyeing. Tomorrow, I'm cleaning the lot of them.


This is what happens when you don't notice the printing stamped on a piece of pipe. Those red marks in the upper left are unintentional image transfers.


They could be cut out, covered up, or incorporated into a design. But it's not the kind of surprise that delights everyone in a class. A little sandpaper and some alcohol, and that printing will be history.

Except for maybe a couple of pieces I'll stash for some day when I feel like making little red text transfers. Or when I reach for those pieces by mistake.

Tuesday, June 12, 2012

What Would You Wear With A Fascinator?

The willow crowd will be gathering in Decorah, Iowa in a couple of weeks, so over the weekend I used some of my willow-dyed fabrics to make myself a little fascinator to wear. Yesterday, I bought another bolt of buckram. These are so fun to make I might have to do more this fall.


As fascinators go, it's pretty simple. Almost plain. Not a scrap of veiling in sight.


Personally, I think it would go best with Scarlett O'Hara's green velvet curtain dress (or maybe the Carol Burnett version). But all those hoop skirts sound a little hot for Iowa in summer (not to mention I'm teaching and would probably knock over students and dyepots in my wake).


As usual, whatever I wear will have to go with hiking boots and orthotic insoles, because my dogs have been barking rather a lot lately. (Notice how a fascinator makes you speak in 40's lingo and/or a British accent?)


I am quite please with how it came out. I made the elastic removable so I can take it off and use the hat as a sample in my Willow Spirit Vessels class. The elastic is recycled from the name tag from another conference, and colored with fabric markers to blend with the hat and my hair. Which was not fit for photography when I took these shots.

I shall take more pictures, once I've been through my wardrobe and completed the usual full-blown linear panic about what to wear at a conference. Perhaps with this focal accessory perched above my smiling face, no one will notice what else I have on.

What would you wear with a fascinator?