Liquid metal, metal liquor -- whatever you call it, it's a pretty effective way to make marks on fabric. When you add willow to the mix, the results can be even more exciting.
To make iron liquor, stuff one or two pads of steel wool into a bottle and add vinegar. Don't fill the bottle too full, because it will fizz up as the acid starts to work on the metal. (It's lovely to have studio flooring that isn't precious!) Don't cap the brew while it's working. I rubber band a piece of fabric over the opening to keep bugs out. The longer it brews, the stronger the liquor gets, but you can use it after just a few days.
To use the liquor, strain it through a piece of fabric to catch any undissolved metal bits. Then apply to fabric. I generally apply it to fabric that has been dyed with willow, sumac or rhubarb leaves. I've had good success with fabrics that were cold-bundled, steamed and simmered in bundles as well as immersion dyed with willow.
This test piece is a silk scarf that was very briefly simmered in a willow immersion dyebath. My iron liquor had only been working for a few days, so the color was a very light gray. I applied the liquor with a Tsukineko Fantastix applicator, but have done brush and sponge applications, too.
Older (more aged?) iron liquor and more willowy fabric can give darker (as in black) marks.
I'm cheating here (trying to get caught up on my willow dye posts for the SDA group) and using a photo from last winter. This shows iron liquor used with the tannin liquor I make from staghorn sumac leaves and vinegar. I make the same kind of tannin liquor using willow leaves and vinegar, but these are the pictures I can find at the moment. I soaked the folded/clamped fabric (a recycled cotton percale pillowcase) with the tannin liquor, then mopped up a puddle of very old iron liquor with it.
Here's the resist pattern on that pillowcase.
For most of my natural dye projects, I like to let a piece oxidize for a couple of weeks before I wash it (if I can hold out that long). For mineral-printed pieces, especially ones made with mature (vintage?) iron liquor and especially on silk, I usually rinse the fabric within a few hours.
I'm not worried about metal-made marks washing out. Have you ever left a load of wet clothes in a dryer with chipped enamel on the tumbler?
Showing posts with label mineral printing. Show all posts
Thursday, October 20, 2011
Thursday, February 10, 2011
Iron-Rich Dye-It
Bark Soup left me feeling tired, run-down, listless. Well, not really, but I can't resist the Geritol references since I'm talking about iron and dye(it). Hmm. Now I'm wondering if I could print fabric with Geritol.
Anyway. My mom spent years trying to keep sheets and underwear from turning orange in the wash when we were on the farm, where the high iron content in our well water was pretty high. I seem to remember, too, a crisis caused by wet fabric left in the washer, where a chip in the enamel on the tub left a very permanent orange stain. We won't be telling Mom I do this on purpose now.
One of the easiest ways to do mineral printing is to dampen fabric, wrap it around something that a) is rusty or b) will rust, and keep it from drying out while the color develops. That's why the piece above is inserted in a plastic bag -- to keep it from drying out. You can't see in the picture, but the bag is not sealed. You want this to oxidize.
The photo above shows what that sample looked like after being left overnight and unwrapped the next day. The color on this piece was produced by rusty sheet metal and the chain I used to hold fabric bundles down in the simmering bark soup. The fabric is a cotton percale pillowcase from the thrift shop. My favorite part of this piece was the seam at the border.
The liquid you use to dampen the fabric can be plain water (takes longer), a mixture of vinegar and water (faster), plain vinegar (faster yet), or what I call Tannin Juice.
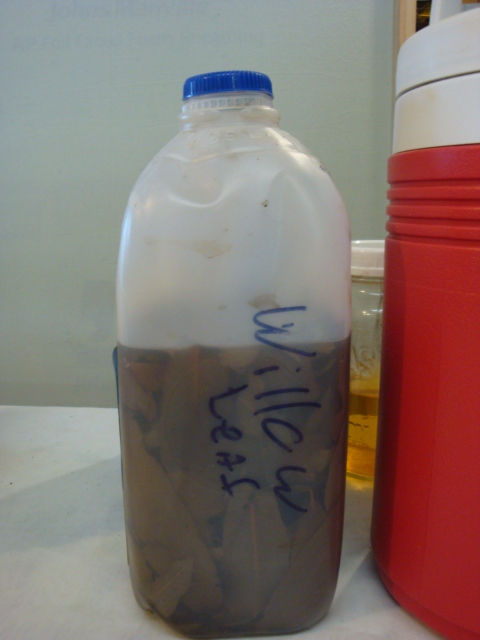
Tannin Juice is basically vinegar on steroids. In summer, I stuff fresh willow leaves or fresh staghorn sumac leaves into jugs of vinegar. That's it. Put a cap on it, let it sit in a dark corner, and pull it out when you want a really fast, strong reaction. As always, you'll want to sample this. Because the results may be unexpected.
I did a little experiment with Tannin Juice to test how I might use it for resist printing. The fabric here is some of the cotton that was soaked overnight in an iron kettle with elm bark then simmered in bark soup with an iron chain. You may not see any rusty orange on it, but this fabric is not only tannin-infused but also mineral-infused. I laid string I had used to tie up bundles on the fabric, then brushed over it all with Tannin Juice. This isn't as black as I've gotten on other pieces (mostly silk), but it is pretty dramatic. I don't like the hard lines I got from brushing on the tannin juice. Next time I'll put the juice in a spray bottle.
I did another little experiment to sample how I might use the pickled sumac leaves from the Tannin Juice.
I laid the leaves on another piece of fabric from the bark soup collection, pulling them out of the jug with a pair of long forceps.
I wadded the fabric around the leaves, then poured on a bit of iron liquor, which I make by dissolving metal (steel wool works well) in vinegar.
The orange is from the iron liquor. The black is from the pickled sumac leaves.
I promised last time to show some of the Bark Soup fabric overdyed in the indigo vat. The vat is due for some attention, but two dips gave me a soft shift in the color that I really like.
I was thinking I would use this fabric in a wall piece, but now I'm wondering if I have enough to make another Crossover Top from the Kayla Kennington pattern.
It will have to wait a bit, though.I'm chained to the computer for a few more days until I complete another project. In the evenings I've been looping motifs for my freeform vest and making looped heart pins for Valentine's Day.
Would you like a short tutorial on the hearts? Let me know in the comments.
Anyway. My mom spent years trying to keep sheets and underwear from turning orange in the wash when we were on the farm, where the high iron content in our well water was pretty high. I seem to remember, too, a crisis caused by wet fabric left in the washer, where a chip in the enamel on the tub left a very permanent orange stain. We won't be telling Mom I do this on purpose now.
One of the easiest ways to do mineral printing is to dampen fabric, wrap it around something that a) is rusty or b) will rust, and keep it from drying out while the color develops. That's why the piece above is inserted in a plastic bag -- to keep it from drying out. You can't see in the picture, but the bag is not sealed. You want this to oxidize.
The photo above shows what that sample looked like after being left overnight and unwrapped the next day. The color on this piece was produced by rusty sheet metal and the chain I used to hold fabric bundles down in the simmering bark soup. The fabric is a cotton percale pillowcase from the thrift shop. My favorite part of this piece was the seam at the border.
The liquid you use to dampen the fabric can be plain water (takes longer), a mixture of vinegar and water (faster), plain vinegar (faster yet), or what I call Tannin Juice.
Tannin Juice is basically vinegar on steroids. In summer, I stuff fresh willow leaves or fresh staghorn sumac leaves into jugs of vinegar. That's it. Put a cap on it, let it sit in a dark corner, and pull it out when you want a really fast, strong reaction. As always, you'll want to sample this. Because the results may be unexpected.
I did a little experiment with Tannin Juice to test how I might use it for resist printing. The fabric here is some of the cotton that was soaked overnight in an iron kettle with elm bark then simmered in bark soup with an iron chain. You may not see any rusty orange on it, but this fabric is not only tannin-infused but also mineral-infused. I laid string I had used to tie up bundles on the fabric, then brushed over it all with Tannin Juice. This isn't as black as I've gotten on other pieces (mostly silk), but it is pretty dramatic. I don't like the hard lines I got from brushing on the tannin juice. Next time I'll put the juice in a spray bottle.
I did another little experiment to sample how I might use the pickled sumac leaves from the Tannin Juice.
I laid the leaves on another piece of fabric from the bark soup collection, pulling them out of the jug with a pair of long forceps.
I wadded the fabric around the leaves, then poured on a bit of iron liquor, which I make by dissolving metal (steel wool works well) in vinegar.
The orange is from the iron liquor. The black is from the pickled sumac leaves.
I promised last time to show some of the Bark Soup fabric overdyed in the indigo vat. The vat is due for some attention, but two dips gave me a soft shift in the color that I really like.
I was thinking I would use this fabric in a wall piece, but now I'm wondering if I have enough to make another Crossover Top from the Kayla Kennington pattern.
It will have to wait a bit, though.I'm chained to the computer for a few more days until I complete another project. In the evenings I've been looping motifs for my freeform vest and making looped heart pins for Valentine's Day.
Would you like a short tutorial on the hearts? Let me know in the comments.
Labels:
indigo,
looping,
mineral printing,
natural dyeing
Wednesday, December 1, 2010
Yes Sir, Yes Sir, Two Bags Full Of Ideas
Here's the update on the bag I introduced last week, and another recycling project.
The Indigo/Walnut Tote
Last week while I was giving the indigo vat a workout, I overdyed a tote bag I started last summer. I was cleaning up after a slapdash experiment to use a Rubbermaid bin as a solar oven for Mason jar dyeing. There was a bit of walnut dye left in the bottom of a jar. I think there might have been some vinegar or something else in there too (did I mention I didn't take notes?). Anyway, I didn't want to put that liquid back in the walnut dye container. So I scruched up a pre-made canvas tote bag and shoved it into the jar. No scouring or presoaking. You can see it didn't dye evenly (just the way I like it).
I took it out of the jar a couple days later, hung it up to dry, and it's been oxidizing since. As a lazy dyer, I'm a big fan of oxidizing -- except when it happens to stains in my wardrobe because I didn't wash them out right away.
Last week, I finally washed the bag. After rinsing it, I kept it damp. Then it went into the indigo vat. Here's what it looked like after oxidizing this time (a quicker and more dramatic process with indigo).
My walnut dye has been "saddened" with a bit of iron, and I love the way it warms the indigo.
Over the weekend I added a couple of outside pockets to this bag.
Now I need some advice: Is this guy-ish enough for a college-age man who shops at the farmers market to appreciate as a Christmas gift?
The Doorknob Bag
While cleaning this fall, I ran across another natural dye experiment from a few years ago. This week, I used it to make a bag to hang on the doorknob in my studio. Myfantasy intention is to tuck receipts, packing slips and other documents that need to go into the office here instead of scattering them amongst the debris on my work table.
The fabric is huck toweling I stained with tea and turmeric, then mineral printed with vinegar and nails. For the bag, I also used a woolen necktie I from the thrift shop and a swatch of my Spoonflower fabric.
The bag is a bit wide for a doorknob hanger because I wanted it to fit a notepad as well as receipts. So it doesn't flop on the knob, I snipped the ends off a couple of electrical cable ties and threaded them into a casings at the rim.
I used the necktie for the hanger and edging and a flap over the top. As I was working on it, I wanted to keep the necktie-iness with that little tab at the lower left. Naturally, that break in the line is the first thing my eye goes to and it's annoying me, but probably not enough to change it.
While working on this bag, I tried to remember why I never did any more dying on huck toweling. I love this stuff with or without traditional huck darning embroidery.
So now I'm thinking of other ways I might use huck toweling. Feel free to chime in!
The Indigo/Walnut Tote
Last week while I was giving the indigo vat a workout, I overdyed a tote bag I started last summer. I was cleaning up after a slapdash experiment to use a Rubbermaid bin as a solar oven for Mason jar dyeing. There was a bit of walnut dye left in the bottom of a jar. I think there might have been some vinegar or something else in there too (did I mention I didn't take notes?). Anyway, I didn't want to put that liquid back in the walnut dye container. So I scruched up a pre-made canvas tote bag and shoved it into the jar. No scouring or presoaking. You can see it didn't dye evenly (just the way I like it).
| Walnut dye on canvas tote bag |
Last week, I finally washed the bag. After rinsing it, I kept it damp. Then it went into the indigo vat. Here's what it looked like after oxidizing this time (a quicker and more dramatic process with indigo).
| Walnut dye then indigo after rinsing |
Over the weekend I added a couple of outside pockets to this bag.
| Pocket fabric is my Doodle Leaf design from Spoonflower |
Now I need some advice: Is this guy-ish enough for a college-age man who shops at the farmers market to appreciate as a Christmas gift?
The Doorknob Bag
While cleaning this fall, I ran across another natural dye experiment from a few years ago. This week, I used it to make a bag to hang on the doorknob in my studio. My
The bag is a bit wide for a doorknob hanger because I wanted it to fit a notepad as well as receipts. So it doesn't flop on the knob, I snipped the ends off a couple of electrical cable ties and threaded them into a casings at the rim.
I used the necktie for the hanger and edging and a flap over the top. As I was working on it, I wanted to keep the necktie-iness with that little tab at the lower left. Naturally, that break in the line is the first thing my eye goes to and it's annoying me, but probably not enough to change it.
While working on this bag, I tried to remember why I never did any more dying on huck toweling. I love this stuff with or without traditional huck darning embroidery.
So now I'm thinking of other ways I might use huck toweling. Feel free to chime in!
Labels:
fabric,
indigo,
mineral printing,
natural dyeing,
Spoonflower
Subscribe to:
Posts (Atom)