Here's another easy, free, online image processing utility. My first encounter with
Picnik came when I started using
Spoonflower to design custom printed fabric like
Warm Hands.
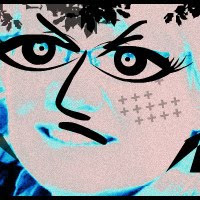
It's fun to just play with no particular outcome in mind just to see what you come up with. But sometimes it's easier to start when you have a sense of what's possible. So here's how I used Picnik to create an avatar -- not the blockbuster film kind, but a small image to represent an online identity. This is a process I want to share with a group of art educators I'm speaking to next month, and some young fiber campers I'll be working with this summer.
For this project, I uploaded the JPG image I use for my Google
profile picture to Picnik. Here's what came next:
Edit. Select the Edit Tab and click
Colors. I chose the Neutral Picker and selected the red in my skin tone. Then I reduced Saturation to -71 and increased Temperature to 47. Then I clicked OK.
Save. I selected the Save & Share Tab and saved the color-corrected image to my computer with a unique name. It's a good idea to keep saving. Even with the Undo tool, you never know when you'll want to go back to an earlier version. After saving to my computer, I chose Continue Editing.
Create. Next selected the Create Tab, where there are lots of fun tools. On my face, I applied
Stickers from Loosy Design and Similies. As you work with Stickers, a dialog box will appear to let you flip, change the color, fade and blend. Resize, rotate and move the sticker using the handles on the element.
Effects. Still in the Create Tab, next I chose
Effects. I was playing with the idea of going blue for this avatar, so under effects I scrolled down to the selection of tools under
Color. I clicked Color > Tint > Apply in Normal mode. Still in Create > Effects, next I selected the
DuoTone tool, chose a second color, and adjusted Brightness, Contrast and Fade. Still in Create > Effects, next I scrolled up to
Camera . I clicked Camera,
Cinemascope and checked Yes to Letterbox My Photo. That's a wrap.
 Edit Again.
 To use this image as an online avatar, I need it to be square, not rectangular. So I return to the Edit menu and select
Crop. From the dropdown menu, where it says "No Constraints" I chose instead Square and changed the actual size to 200 x 200. This way, instead of relying on a site's default cropping mechanism, I can choose what parts of the image I want to keep when I go from rectangle to square.
I probably should have flopped the image horizontally to direct my avatar's gaze toward the right-hand side of a web page. Didn't think of that until just now. Oops.
Have fun playing with Picnik and
Sporkforge. I'm working on the next phase of my Gimp Learn-Along, and will post again on that soon.


No comments:
Post a Comment
This blog has moved to http://donnakallnerfiberart.com. I hope you'll join the conversation there!